Select Repo Settings
After you’ve created a project, you might want to go in and tweak your Tugboat repo settings. When you go into Repository Settings, you can:
- Modify settings for your GitHub, GitLab, or Bitbucket integration
- Rebuild Orphaned Previews Automatically
- Rebuild Stale Previews Automatically
- Refresh Base Previews Automatically
- Specify Build Timeout
- Modify Environment Variables
- Set up Remote SSH Access
- Authenticate with a Docker Registry
- Configure Private Previews (IP Filtering)
- Delete the repo
Don’t forget to hit the Save Configuration button after you’ve checked or unchecked boxes to save your changes.
If you later need to change Repository Settings, you can do that anytime; see: Change Repository Settings.
Modify settings for your GitHub, GitLab or Bitbucket Integration
When you’re using the Tugboat integration with GitHub, GitLab or Bitbucket, you’ll see provider-specific settings for each of your Tugboat repos. These settings enable you to do things like automatically create a Preview when a Pull Request or Merge Request is opened, or post a comment to a PR with links to its Preview. For a full list of the provider-specific integration options, check out:
Info
Want to create a generic user to post comments to your linked git provider? Take a look at Add a Tugboat bot to your team for details.
Rebuild Orphaned Previews Automatically
When this option is selected, Tugboat automatically rebuilds Previews when the Base Preview they’re built from is rebuilt. This option is turned off by default.
Rebuild Stale Previews Automatically
When this option is selected, Tugboat automatically rebuilds Previews when the Base Preview they’re built from is refreshed. This option is turned off by default.
To unpack this a little:
- When you’re using a Base Preview
- And the Base Preview is
refreshed
(You may manually Refresh a Base Preview, or have Tugboat refresh Base Previews automatically, for example, every day at 12am UTC.) - The Base Preview kicks off the
build process from the
updatephase, and runs commands in bothupdateandbuild - When the Base Preview refresh is complete, child Previews kick off a build process from
build, using the Base Preview as the starting point and bypassing commands ininitandupdate.
Refresh Base Previews Automatically
By default, Tugboat refreshes your Base Previews every day at 12am UTC. You can de-select this checkbox to turn off automatic refresh, or you can specify your preferred interval and time for the refresh to occur. Automatically refreshing Base Previews is a great way to ensure your large assets, such as databases, stay up-to-date, saving you time when you build a new Preview from a recently-refreshed Base Preview.
Specify Build Timeout
By default, Preview builds timeout at 3600 seconds. You can change the Preview build timeout to your preferred interval.
Modify Environment Variables
Here’s where you can enter environment variables, like API keys or passwords, that you wouldn’t want to store in your repo. If you’re looking for Tugboat’s environment variables to add to your Build Scripts or configuration files, check out Reference -> Environment Variables.
Set up Remote SSH Access
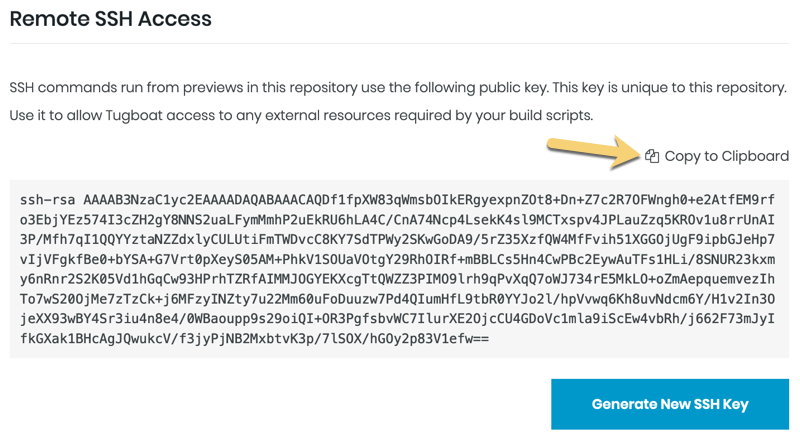
SSH commands that you run from Previews in this repository use the public key in your repo settings. Each of your repositories linked to Tugboat have a unique SSH key. Put this public key on the remote servers that your build scripts or applications need to access.
Info
You can’t SSH into a Tugboat Preview; the SSH key here is all about outbound requests to remote resources. If you want to get into a Tugboat Preview, shell access is provided in both the web interface and the command line tool.
Use the Tugboat SSH key
When you link a git repository to Tugboat, Tugboat automatically generates an SSH key for that repo. You can access this key in Repository Settings; scroll to the Remote SSH Access option. To use the SSH key, simply copy it to your clipboard and put it where you need it!
Info
Tugboat provides a private 4096 bit length RSA SSH key. What you see on the Repository Settings page is the public key from the pair.
If you want Tugboat to generate a new SSH key, press the Generate SSH Key button. You’ll see a dialog box asking you to confirm that you want to generate a new key, as this action can’t be undone.
Warning
If you have Tugboat create a new SSH key, this automatically erases the existing SSH key. If you’re using this SSH key anywhere, you’ll need to update that when you generate a new key.
Delete an SSH key
Need to delete or get rid of an SSH key? Go to Repository Settings; scroll to the Remote SSH Access option for the repository whose key you want to delete, and press the Generate SSH Key button. Generating a new key permanently erases the old key.
Authenticate with a Docker Registry
If you want to pull images from Docker registries that require authentication, you can manage your authorization credentials from within the repo settings.
By default, when you specify a Docker Hub image to use in Tugboat builds, we use a Tugboat-authenticated user to pull those images. This authentication only applies to Docker Hub; Tugboat pulls from other registries anonymously.
If you need to pull an image from a registry that requires specific authentication credentials, adding your Registry Authentication credentials to the repository settings will use those credentials for every image pull made from this repository, overriding Tugboat’s default or anonymous user.
Info
If you are setting credentials to authorize with Docker Hub, leave the Server field blank.
By managing these credentials on the repository-level, there’s no need to specify credentials in your Tugboat
config.yml file. Setting those credentials here automatically applies them
when Tugboat pulls images to build your previews.
You can specify multiple authentications for the same registry. When multiple authentications are provided, Tugboat attempts to use each one in turn until it can successfully pull the image. If none of the credentials work, Tugboat cannot pull the image and will instead throw an error.
Configure Private Previews (IP Filtering)
Tugboat Tier
Private Previews are only available to Tugboat Premium or On-Premise subscribers. If you’d like to use Preview IP Filtering, contact us to upgrade your project to a Premium subscription.
Want to restrict access to a Preview URL to only allow a specified set of IP addresses or subnets to view a Tugboat Preview? Press the + Add button to specify IPv4 or IPv6 addresses or subnets that should be allowed to access Previews built from this repository.
How to format config values for Preview IP filtering
The config can accept any of the following
- Any valid IPv4 subnet, using CIDR notation
- Any valid IPv6 subnet, using CIDR notation
- Any valid IPv4 address. We will automatically append a /32 CIDR subnet mask
- Any valid IPv6 address. We will automatically append a /128 CIDR subnet mask
For more information about CIDR notation, take a look at the Wikipedia article: Classless Inter-Domain Routing.
How Preview IP filtering works
When no filters are provided, no filtering is done. A Preview URL is publicly accessible to anyone who has the link. This is how Tugboat has always worked. However, we do programmatically add an unguessable hash to the URL to prevent “guessing” Preview URLs by looking for an exploiting a pattern to the URL.
Allow filters
When using Preview IP filtering, if one or more filters are provided, ONLY requests coming from an address that matches one of those filters are allowed access to the Preview URLs. Any other requests get a 404 - Preview Not Found.
An address “matches” if it is a member of any of the subnets in the list of filters.
Optional Deny filters
In addition to allow filters, Tugboat also offers deny filters. However, those can only be managed by the API or CLI. When using deny filters, they are processed after allow filters.
If both allow and deny filters are present, a source IP must match an allow filter, but must not match a deny filter in order to access a Preview URL.
If only deny filters are present, a source IP must not match a deny filter in order to access a Preview URL.
Ultimately, deny filters are not very useful on their own, but provide a way for advanced users to allow access to a large subnet, and then specify exceptions to that allow list.
Delete the Repository
If you want to delete a repo from your Tugboat project, you’ll go into the Repository Settings for that repo and press the Delete Repository button. Deleting a repo from Tugboat does not affect any data in the git provider repo connected to it, nor does it delete the Tugboat project that contains the repo.
Note
Only Admin users have the Delete Repository option. For more on user permissions, see: User permission levels explained.
Change Repository Settings
Any time you need to make a change to Repository Settings:
- Go to username -> My Projects at the upper-right of the Tugboat screen.
- Select the project where you want to edit repository settings.
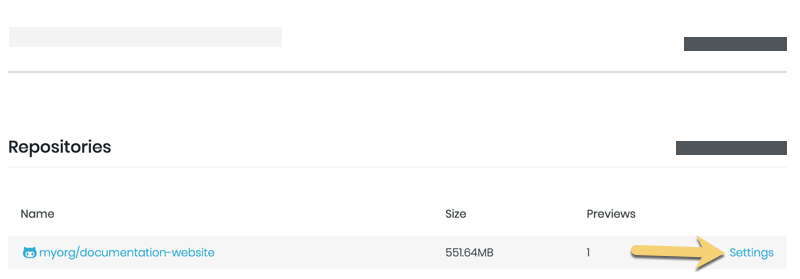
- Scroll to the linked repository whose settings you want to change, and click the Settings link.
From here, you’ll see all the Repository Settings you can modify. If you make changes to the settings, don’t forget to press the Save Configuration button!
.


